

Key Takeaways
- Start early: Confirm move-out dates, review condition records, and book predictable work before the resident leaves.
- Set priorities: Address safety and major systems before cosmetic improvements.
- Coordinate work: A clear vendor sequence prevents repeat cleaning and unnecessary delays.
- Finish thoroughly: Final testing and move-in photos help prevent early maintenance calls.
The days between tenants are expensive. Rent stops, but mortgage payments, taxes, insurance, and utilities continue. Every day a home sits unprepared or half-repaired adds to the cost. A disciplined turn process takes the property from move-out to rent-ready while protecting its condition.
At Texas Property Management Partners, we coordinate this work for Greater Houston owners. This checklist covers inspections, repairs, scheduling, and marketing for rentals in Katy, Cypress, Sugar Land, The Woodlands, and surrounding communities.
Want More Information?
Why Speed Matters
A home renting for $2,000 monthly loses roughly $65 a day during vacancy. A 30-day turn costs about $2,000 in lost rent before repairs; reducing it to 14 days saves more than $1,000. A rushed turn that leaves defects behind creates repair calls and unhappy residents.
Set a target timeline, often seven to fourteen days for a home in ordinary condition, with longer schedules for major repairs. Track delays: slow vendors need backup options, late materials need earlier orders, and approval bottlenecks need clear spending limits.
Stage 1: Before the Tenant Leaves
The best turns start before move-out day. Once notice arrives:
- Confirm the date in writing and provide move-out instructions.
- Schedule a pre-move-out inspection if the lease allows.
- Order predictable materials and reserve painters, flooring installers, and cleaners.
- Start marketing where permitted, using presentable photos and realistic showing dates.
- Review the original move-in report for comparison.
Stage 2: The Move-Out Walk-Through
After key return, inspect promptly, ideally within a day. Take dated photos and video of:
- Walls, ceilings, paint, and all flooring.
- Doors, locks, windows, screens, and blinds.
- Appliances, cabinets, countertops, and sinks.
- Toilets, tubs, showers, grout, and exhaust fans.
- HVAC equipment, filters, thermostats, and vents.
- Water heaters, visible plumbing, and leaks.
- Outlets, switches, lights, and smoke and carbon monoxide detectors.
- Garages, openers, storage, yards, irrigation, fences, gates, and exterior surfaces.
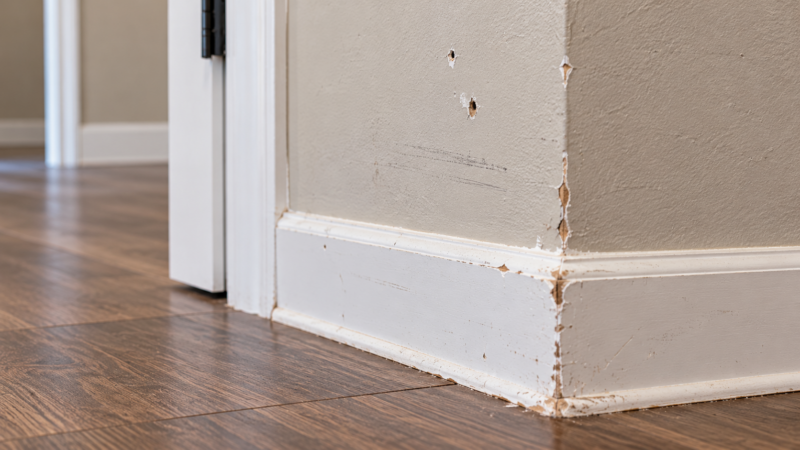
Separate tenant-caused damage, normal wear and tear, and safety or code issues. Damage deductions depend on the lease and Texas law; normal wear is the owner’s responsibility. Address safety issues regardless of cause.
Stage 3: Safety and Systems First
Before cosmetics, test smoke and carbon monoxide detectors and replace them as needed. Check locks, rekey the home, service the HVAC system, replace filters, investigate leaks, inspect the water heater, test GFCI outlets, and check garage-door operation.
Texas has specific security-device and rekeying requirements; verify the rules for your property. Completing these checks also reduces avoidable maintenance calls after move-in.
Stage 4: Cleaning and Cosmetic Work
Once safety and systems are handled, improve first impressions:
- Deep clean rooms, appliances, cabinets, and closets.
- Touch up or repaint with neutral colors.
- Clean or replace flooring as needed.
- Replace worn blinds, outlet covers, doors, and stained fixtures.
- Mow, edge, trim, and clear exterior debris.
- Pressure wash appropriate walkways and exterior surfaces.

Choose upgrades by return, not personal taste. Fresh paint, clean floors, bright lights, and tidy landscaping improve presentation. Compare costly renovations with the rent increase they can realistically support.
Have More Questions?
Stage 5: Scheduling Vendors Efficiently
A common sequence is repairs, painting, flooring, deep cleaning, then final touch-ups. Cleaning before painting creates rework. Give vendors clear scopes, deadlines, and photos. Bundle compatible jobs to reduce trips, maintain backup contractors, and set pre-approved spending limits so routine work can proceed without repeated sign-offs.
Stage 6: Marketing While You Prepare
Start marketing when the home is presentable, or earlier with an accurate coming-soon notice. Strong marketing includes:
- Professional photos, video, and appropriate 3D tours.
- A rental price based on current comparable homes.
- Honest descriptions of property features and nearby amenities.
- Distribution across major rental platforms.
- Flexible showing options, including self-guided tours where appropriate.
- A clear application process
- Published screening criteria.
Stage 7: Final Quality Check
Before declaring the home rent-ready, verify completed repairs, cleanliness, working lights and appliances, keys, remotes, thermostat operation, and utility readiness. Take final photos for the move-in report. A thorough check prevents early maintenance calls and starts the tenancy well.

Keep a turn reserve by setting aside part of monthly rent for turnover and capital costs. Available funds prevent approval delays. Compare larger replacements, such as durable flooring, with their potential to reduce future turnover work.
Check small details applicants notice: bright bulbs, working blinds, a clean entry, fresh bathroom caulk, and a neutral, fragrance-free smell.
The Rent-Ready Master Checklist
- Confirm move-out and inspect early where permitted.
- Book vendors and order materials.
- Document move-out condition promptly after key return.
- Separate damage, normal wear, and safety work.
- Rekey locks and test alarms and major systems.
- Sequence repairs, painting, flooring, and cleaning.
- Refresh the exterior, photograph, and list.
- Complete the final inspection and move-in report.
How a Property Manager Speeds Up the Turn
A manager combines scheduled inspections, prepared work scopes, established pricing, and parallel marketing. Our veteran-owned Katy firm serves Katy, Conroe, Cypress, Fulshear, Houston, Magnolia, Missouri City, Richmond, Rosenberg, Spring, Sugar Land, The Woodlands, and Waller.
Our in-house brokerage background, professional marketing with 3D video tours, and $100–$250 flat monthly management fees help owners keep homes leased. Two scheduled property assessments each year help identify maintenance needs before turnover.
Bottom Line
Faster lease-up starts with early preparation and ends with a complete inspection. Texas Property Management Partners coordinates vendors, marketing, and property assessments to help owners shorten vacancies while presenting a clean, functional rental.
Ready to Get Started?
Frequently Asked Questions About the Rent-Ready Turn Process
Turnovers run more smoothly when owners plan for uncertain repair scopes, scheduling changes, and the final handoff to residents.
How Should Owners Set a Turn Budget?
Start with the previous condition report, known equipment needs, and costs from earlier turnovers. Separate routine cleaning and touch-ups from larger replacements so each expense has a clear purpose. Keep a reserve available before the property becomes vacant, then refine the budget after the move-out inspection.
Ask vendors to describe the work and materials behind their prices. Reviewing those details helps you compare proposals, approve essential work promptly, and decide which optional improvements should wait until a later turnover.
Can Marketing Begin Before Repairs Are Finished?
Yes, marketing can overlap with preparation when the listing accurately reflects the property and its availability. Use a coming-soon notice if the home is not ready for showings. Replace outdated photos once the work is complete and give prospects a realistic schedule.
Coordinate showings with vendors so visitors do not arrive during disruptive work. Early advertising is most useful when someone also responds to inquiries, explains the application process, and keeps the expected move-in date aligned with actual repair progress.
What If a Contractor Cannot Meet the Schedule?
Identify which later tasks depend on that contractor’s work before moving appointments. A delayed plumbing repair may affect painting and cleaning, while exterior work may proceed separately. Ask for an updated completion date, notify affected vendors, and consider an established backup contractor when appropriate.
Keep the revised work sequence in one place so everyone uses the same schedule. Afterward, record what caused the delay. Repeated material shortages, slow approvals, or missed appointments point to changes worth making before the next turn.
When Is Replacing Flooring Better Than Repairing It?
Compare the current floor’s condition with the cost and expected usefulness of another repair. A small damaged area may need a focused fix, while widespread wear can justify replacement. Include installation time, cleaning needs, future repairs, and the property’s realistic rental price in the comparison.
Durable luxury vinyl plank can reduce repeated flooring work, but the decision should fit the home and budget. Document the choice so the next condition inspection has a clear record of what changed.
What Records Should Be Ready at Move-In?
Keep the final inspection report, dated photos, completed work orders, invoices, and key or remote inventory together. Record equipment that was serviced or replaced and any instructions the new resident will need. Compare this package with the repair list to confirm that nothing remains unresolved.
The move-in record gives the owner and resident a clear starting point for the tenancy. It also helps whoever handles later maintenance understand the property’s recent work without reconstructing the turnover from scattered messages or receipts.
Let’s Get Started!